Skirmish Report
Using LMM R20
Bjorn Benthammer leads his huskarl’s forces back to base camp along a forested portion of the Dalveien. The adventurers, along with the accompanying Bjorning and Græling retinue, encounter a small goblin force headed toward Rimholm. The party decides to get closer to scout out the situation, test each other’s forces, and perhaps take out a few foes in the process.
Since the party is outnumbered, Mángilik the Skald (and Strategist) tries to draw the goblins into an engagement in a narrow pass where they will have the advantage of high ground.
She confirms her intent is to initiate a skirmish conflict and gain some advantage before the conflict.
The goblins are not fresh since they failed a march, but nor are they hungry because they were able to pause for a drink and to eat at the crossroads.
Turn 2
Engagement test: Mángilik’s Strategist 3 VS Bugbear Monster Commander’s Nature 6
Mángilik gets help from Oddmarr’s Scholar and Bjorn’s Commander.
Mángilik rolls 5D and gets 1 success vs the bugbear leader’s 2 successes.
As a twist, the bugbear leads the group off the road and away from cover into an open area. The adventurers will not be able to select who they engage with before the battle begins or use the terrain to their advantage.

Turn 3 Skirmish
The Skirmish conflict begins with the goblins rushing in as the soldiers take formation.
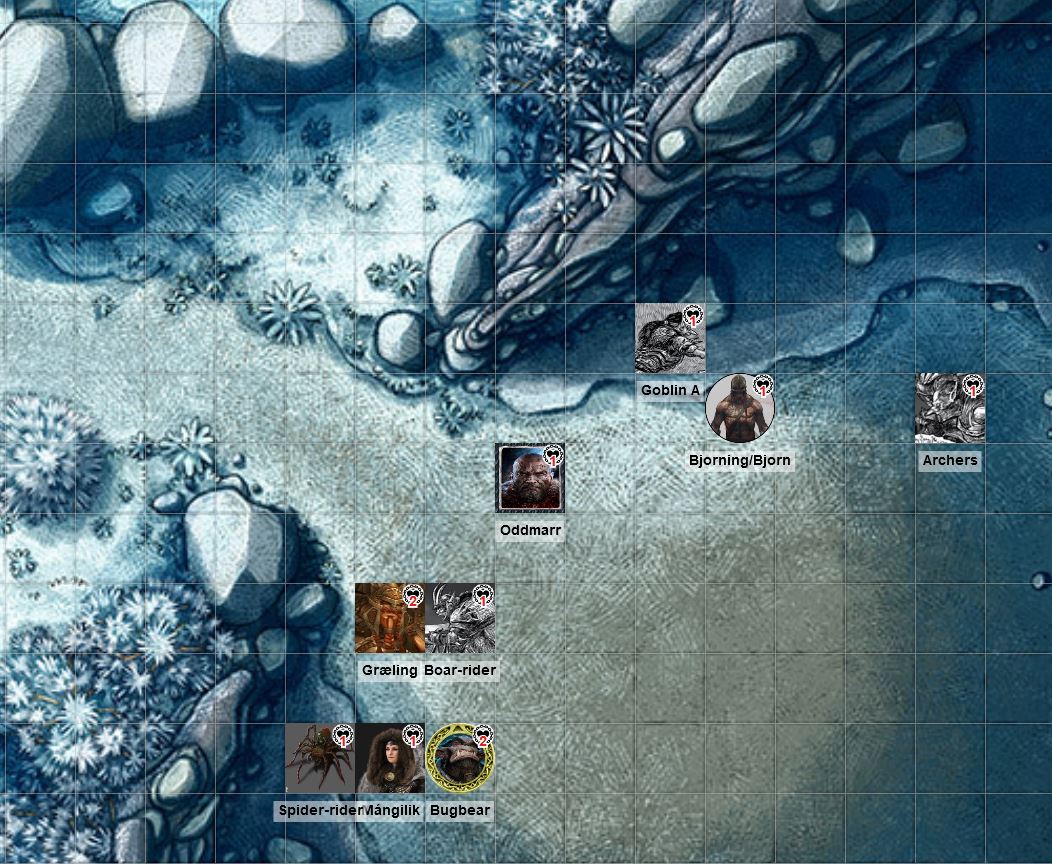
Forces
2 Bugbear (leader)
- Nature 6
- Might 3 (reduced from Might 4 due to unit size)
2 Giant Spider-rider Goblins
- Nature 3
- Might 3 (reduced from Might 4 due to unit size)
48 untrained goblin raiding party x 3 (Goblins A, B, C)
- Nature 3 Might 2
- An untrained unit rolls 2D for its actions.
48 untrained goblin archers
- Nature 3 Might 2
- An untrained unit rolls 2D for its actions.
20 trained Boar-riding goblins
- Nature 3 Might 3
- A trained unit rolls 3D for its actions.
~ VS ~
50 Bjorning guards
- A veteran elite unit rolls 5D for its actions.
50 Græling guards
- A regular unit rolls 4D.
Bjorn Benthammer / Warrior Lvl 6
- Commander 5
- Fighter 5
Mángilik Oathbreaker / Skald Lvl 6
- Fighter 4
- Strategist 4
Oddmarr Bearclaw / Shaman Lvl 5
- Fighter 3
Adventurer Disposition
Bjorn is the only one that has the Commander skill. However, there are two additional heroes that will be unattached that I believe can also be used to generate disposition.
Rolls 8D (Commander 5 + 2D heroes + 1D Fresh)
3 successes + Might of Force 3 = 6 HP
- 2 HP to the Græling infantry unit
- 1 HP to Mángilik
- 1 HP to Oddmarr
- 2 HP to Bjorning infantry unit and embedded Bjorn commander
Goblin Army Disposition
The bugbear is the commander.
Rolls Nature 6D
4 successes + 3 Might + 1s for outnumbered = 8
- 1 HP to 4x Goblins
- 1 HP to Boar-riders
- 1 HP to Spider-riders
- 2 HP to Bugbear (with leader)
Round 1 (Turn 3-4)
The GM declares Goblin Archers, Goblin B, and Boar-riders
The party figures they will try to match up by declaring Bjornings (infantry with attached commander), Oddmarr (hero), and Grælings (infantry).
Round 1 Action 1
The Bjornings and Bjorn, the attached hero, Maneuver
- 5D veteran unit
- +1D help from the attached hero
- +1D Fresh
Rolls 7D = 3 successes (2 + 1s Might)
Goblin Archers Attack with the Bow
- 2D untrained
- +2D (bonus help for non-infantry action) from nearby goblin A infantry
- +2D (bonus help for non-infantry action) from nearby goblin B infantry
Rolls 6D = 3 successes
Tie. Roll off:
Bjornings roll 5D and get 1 success.
Goblins roll 2D and get 2 successes.
The Bjornings take 1 HP damage.

Round 1 Action 2
Oddmarr Attacks
- Fighter 3
- +2D (bonus help for non-infantry action) from the Grælings
- +1D help from the Bjornings
- +1D Fresh
Rolls 7D = 2 successes (1 + 1s Might)
Goblin B Feints
- Cannot act
The goblin’s feint is thwarted. Oddmarr hoped to finish the battle right here and right now, but the Fates were against him. However, he wades into a sea of goblins along with the Grælings and manages to rout Goblin B and Goblin C.
Round 1 Action 3
Græling Maneuver
- 4D regular unit
- +1D help from Oddmarr
- +1D help from Mángilik
- +1D Fresh
Rolls 7D = 5 successes (buys engage and Flanks the Bjornings into the archers)
Boar-rider Maneuver
- 3D trained
- +1D from bugbears
- +1D from spider calvary
Rolls 5D = 3 successes (Buys Charge bonus for the boar-rider’s next action)
The Grælings rush in formation to engage with the boar-riding goblins.
Two turns advance.
Everyone becomes Hungry & Thirsty.
Round 2 (Turn 5-6)
The GM declares the bugbears, spiders, and boar-riders.
The party declares Mángilik, Oddmark, and the Grælings.
Round 2 Action 1
Mángilik Maneuvers
- Beginner’s Luck Commander
- +2D (bonus help for non-infantry action) from the Grælings
- +1 Brave trait
Rolls 4D = 2 successes
Bugbear Maneuver
- Nature 6
- +1D help from Spider-rider cavalry
- +1D help from Boar-rider cavalry
Rolls 8D = 4 successes (buys engage and disengages the adjacent boar-riders from the Grælings)
Round 2 Action 2
Oddmarr Maneuvers to take on the spiders
- Beginner’s Luck
- +1D trait
Rolls 3D = 2 successes
Spider-Rider Maneuver
- +1D help from bugbears
Rolls 4D = 1 success.
Both units engage.

Round 2 Action 3
Græling Maneuver since they are no longer engaged
- 4D Regular
- +1D help from Mángilik
- +1D help from Oddmarr
Rolls 6D = 3 successes
Boar-riders attack with charge bonus
- 3D trained
- +2D charge bonus
Rolls 5D = 2 success
Two turns advance.
Round 3 (Turn 7-8)
Goblins declare the Goblins A, Boar riders, Bugbears
The players order is Bjornings, Oddmarr, and Mángilik.
Round 3 Action 1
Bjorning Attack
- 5D Veteran
Rolls 5D = 5 successes (4 + 1s Might)
Goblins Maneuver
- 2D untrained
- +1D help archers
- +1D boar-riders
Rolls 4D = 2 successes
The Bjornings use their spears to drive away the Archers, Goblin A, and Spiders

Round 3 Action 2
Mángilik Attacks
- Fighter 4
- +5D Persona
- +1D help from Oddmarr
Rolls 10D = 4 successes
Bugbears Attack
- Nature 6
- +1D Boar-riders
Rolls 7D = 2 successes
The conflict concludes. The party is victorious. Two turns advance from the round.
The grind hits and the party is now Exhausted.
Compromises
Skirmish Victory with Half compromise.
Adventurer Units
- Grælings injured
- Bjornings killed
- Oddmar injured
- Bjorn driven off
- Mángilik driven off
Enemy Units
- Goblin A: Driven off
- Goblin B: Captured
- Goblin C: Killed
- Goblin Archers: Captured
- Spider Riders: Driven off
- Boar Riders: Driven off
- Bugbears: Driven off
Turn 9
The party ties up the prisoners and then takes a moment to both eat and drink to remove Hungry.
The exhausted army returns to base camp so they can interrogate and question the goblins.